Once Facebook Event Creation is configured entering the necessary information will make automation the event creation. The steps are:
- Enter default information
- Enter Course Category information
- Test the automation steps
- Provide details to CourseSales.com to set up the automation triggers
- Confirm the data is entered into your event list, and appears on the correct page
In preparation you need to:
- Facebook You will need to give access to the account scott.w.spence@gmail.com an edit role. Learn how to do this here
- LinkedIn To enable updates to occur you need to add the user mgmtautomation@coursesales.net to your linkedin page. Learn how to do this here
The information you will need is:
- Your Batch Processor Username and Password
- Venue names for where your courses will run, accurately added to your courses
- Facebook Page Id read: Within Facebook: go to your page » about » bottom of Page Info
- Group Id
- Your (optional) Facebook event photos set up under the album “CourseSales.com Photos” each with a description name.
Be aware that by default:
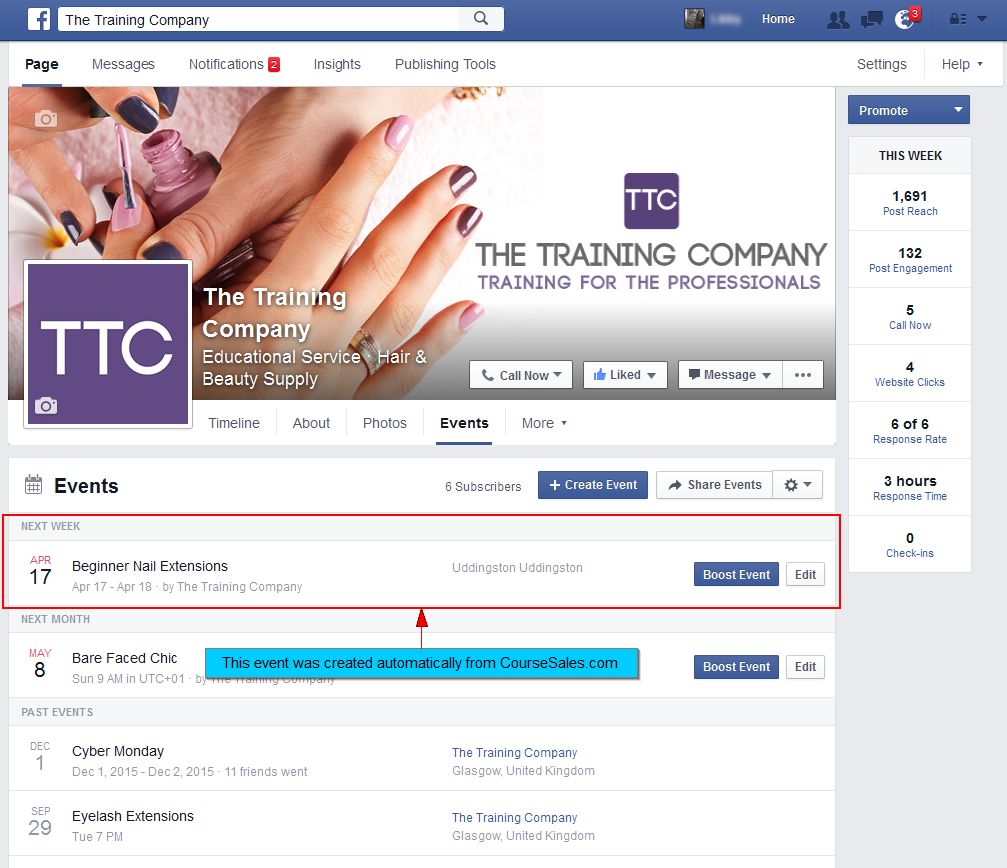
- The name of the event will be the name of the category
- The event will have a start and end date, with a start time of 9am on the first day and an end time of 5pm on the last day
- Events posted can be automatically added to your timeline and automatically added to your page event listing.
- Process rules that include export maps must be linked to a Document, not a Course Date, it is not possible to export from a course date.
- To send the export to the export queue it will be necessary to tick ‘send emails’ - no email will be sent as per the process rules linked to the process step
- Your Facebook username and password will be available in the Export Queue - you may wish to exclude access to this area of CourseSales.com to protect these details.
Enter default information
Default information is used if none exists at the Course Category. It is stored on the option ‘Branch’. If it does not exist, eg a Page Id value does not exist, then the event automation will not work.
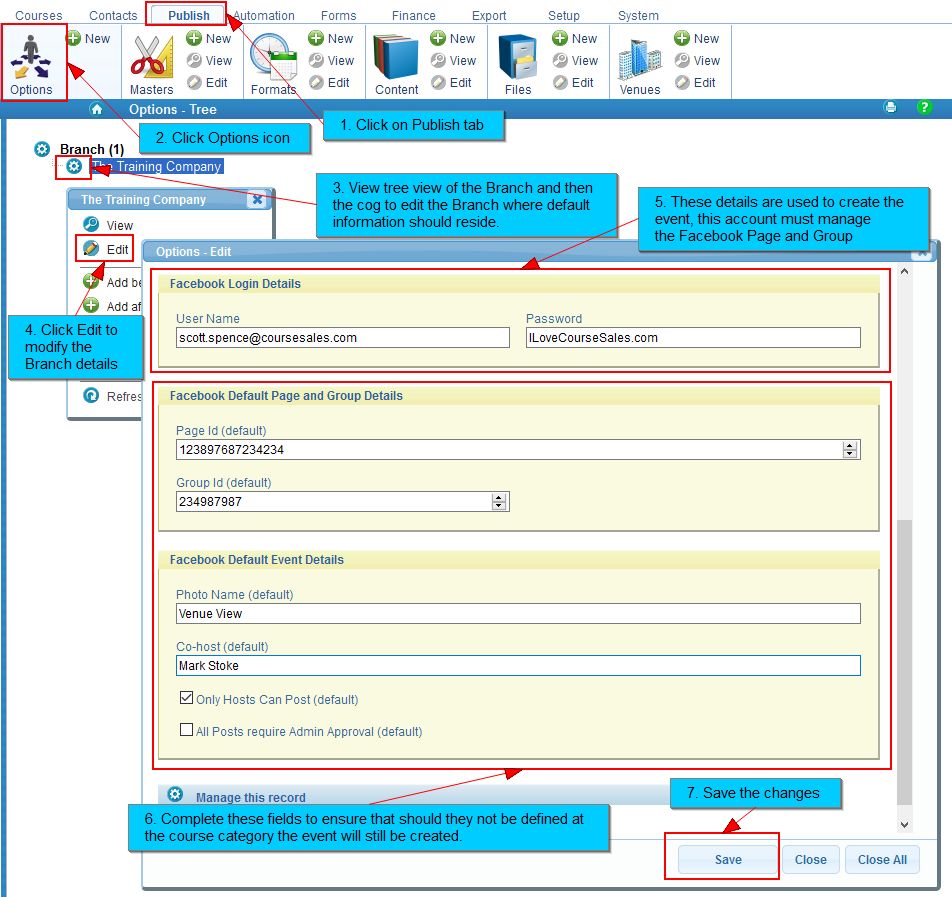
Enter the following information
- Facebook username (email) and password; this account must have access to the Page that you plan on posting the event as, and if necessary administrator right to the Facebook Group.
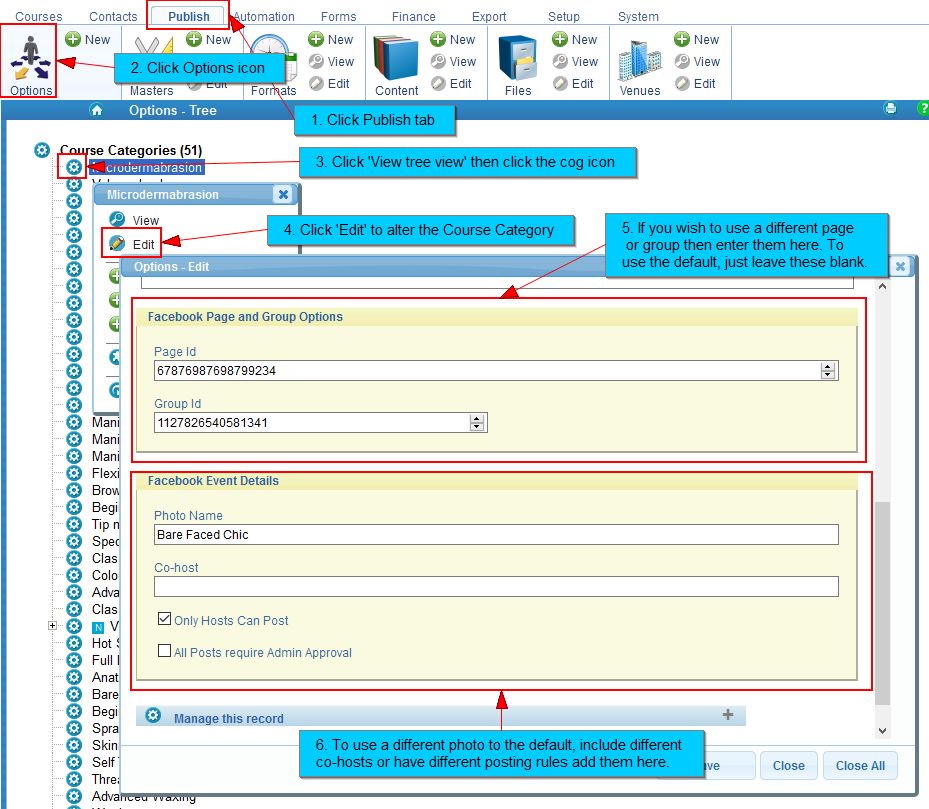
- Page and Group Details; The Page ID is found within Facebook (go to your page » about » bottom of Page Info) Find the Group ID from the URL when visiting the Group.
- Facebook Default Event Details; The photo name is defined in the description. Co-host should be the name of who is co-hosting the event (beta use currently), Only Hosts Can Post means that posting messages to the event cannot be performed by the public (beta function), All Posts require Admin Approval means that public can post but only those posts approved will be published (beta function).
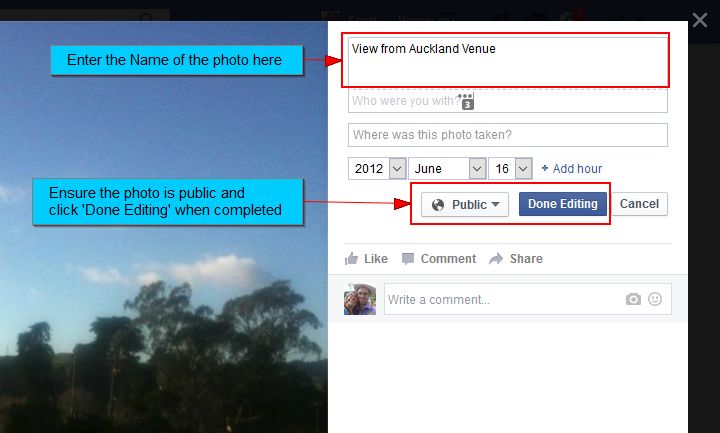
Creating and preparing a Photo for the event
To set up the photos for the events you need to upload the photos in a specific size 784 x 295 and format (to avoid having to reposition the photo).
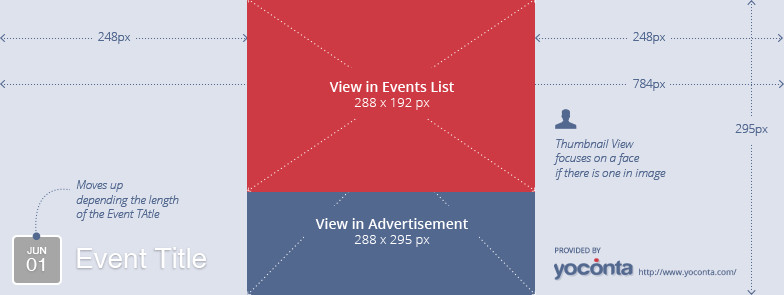
Then put the photos in a folder called “CourseSales.com Photos”. Edit the photo and give the photo a name that you should include in the field ‘Photo Name’ under the Facebook Event Options on the branch form.
Enter Course Category information
If you wish to use just one photo, page, group and posting settings with all events adding the Course Category values is not necessary. To tailor the events based on the course category then add values as necessary. Blank options will be overridden by the default values.
- Page and Group Options
- Event Details
Tips & hints
- You can safely leave the Facebook details on the Course Categories blank and just use the default values (found on the branch).
- You can post events to different pages, ie you could have a page per course category.
- Optional functionality includes different Photos per course category, on the same page, and sharing on a Group
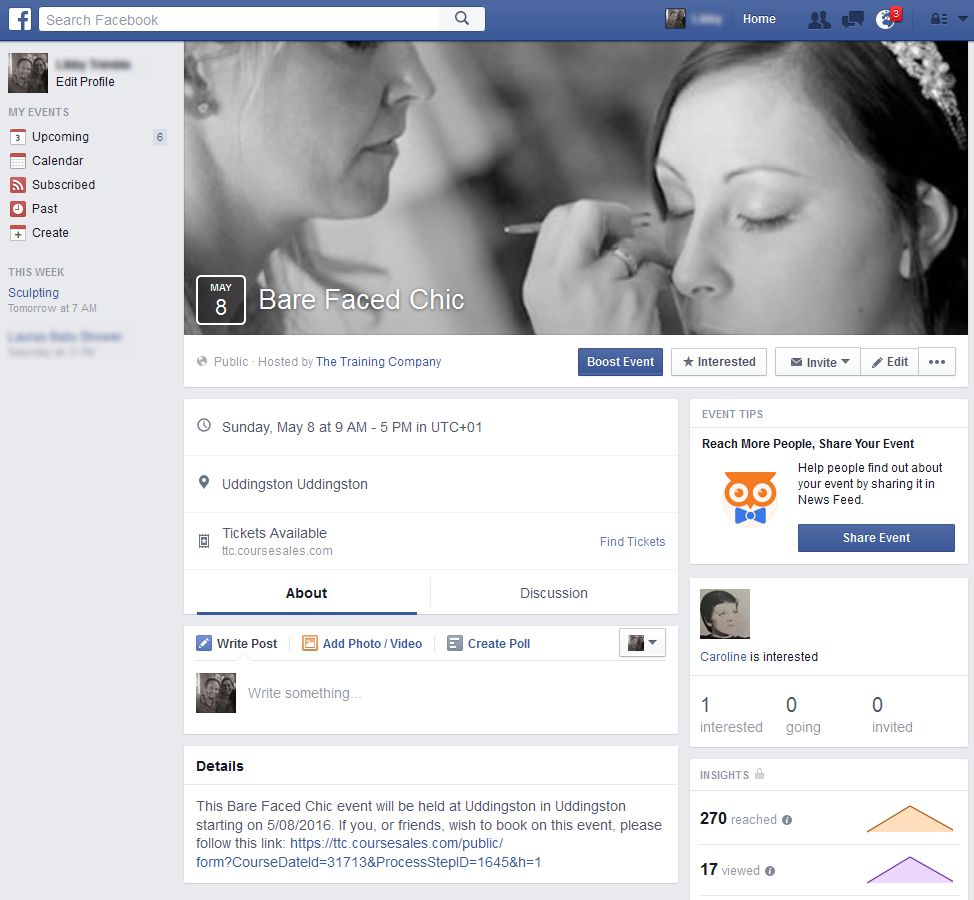
Description of the event created automatically
The following is the description added to each event. The variables in ${xxx} are replaced during this process, and are obtained from the exported values.
- This ${CrsCategory} event will be held at ${CrsVenueName} in ${CrsLocation} starting on ${CrsStartDate}. If you, or friends, wish to book on this event, please follow this link: https://${ShortName}.coursesales.com/public/form?CourseDateId=${CrsDateId}&ProcessStepID=${ProcessStepRegister}
For example:
- This Microdermabrasion event will be held at Capital Hair & Beauty in Aberdeen starting on 5/31/2016. If you, or friends, wish to book on this event, please follow this link: https://ccl.coursesales.com/public/form?CourseDateId=31773&ProcessStepID=1645
Test the automation steps
Preview that the export map will be used when expected, note that you need to tick ‘Send eMails’ even though emails will not be sent.
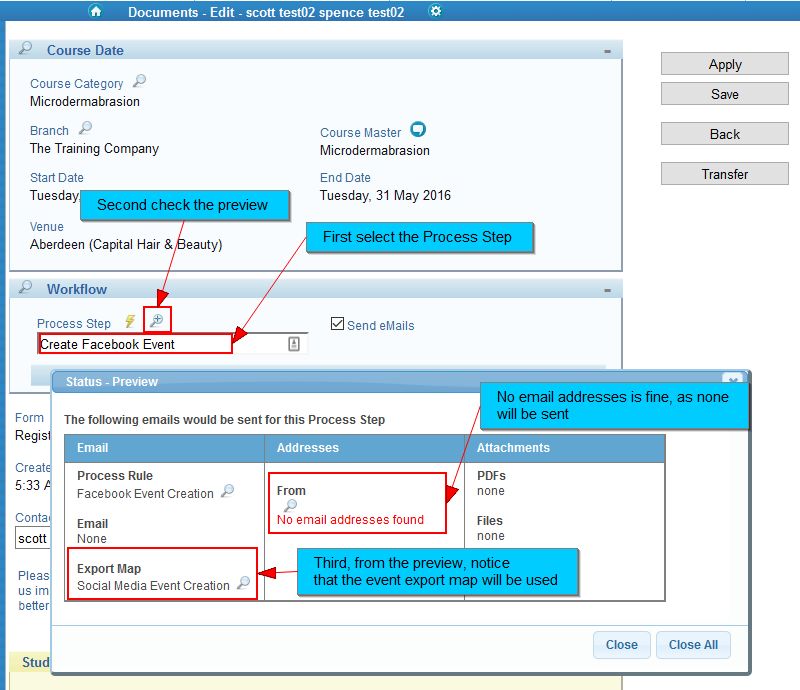
Check that the export is produced as expected
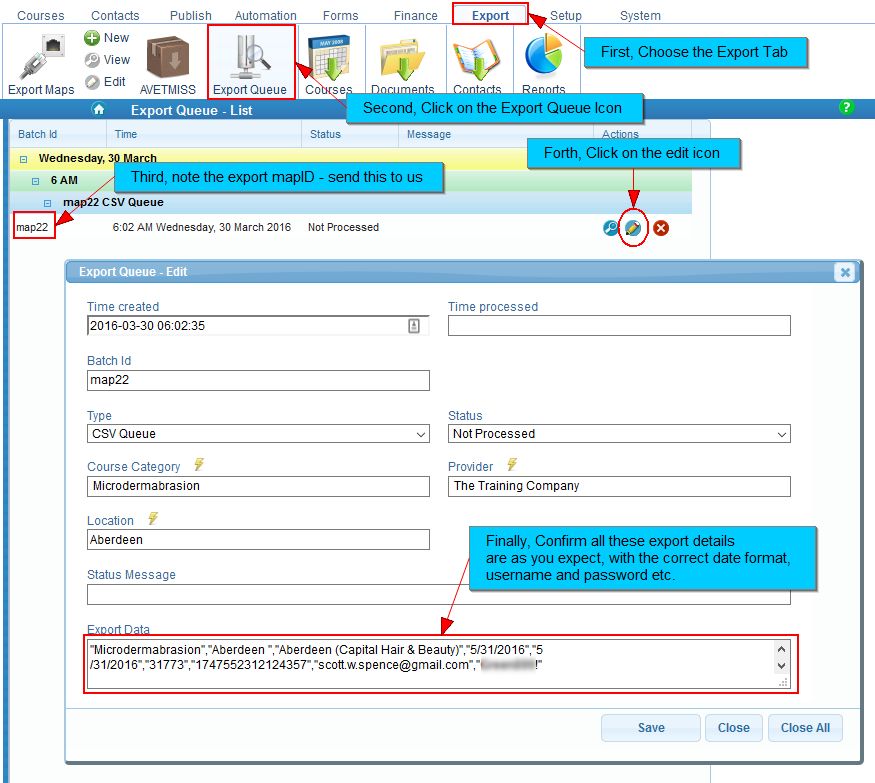
Provide details to CourseSales.com to set up the automation triggers
To set up the regular Batch Processing you need to send us:
- Batch Processor Username and Password
- Map Id for your Event Export Map (detailed below)
- The Process Step Id for your registration step (if you have different registration process steps for different courses you will need to talk to us)
Confirm the data is entered into your event list, and appears on the correct page
Once we have set up the automation apply the process step that you expect will generate the export, then allow 5-20 minutes to see if the event appears on the event list on the page you expect.