Payment methods define how a customer can pay for a course, eg. Credit Card or Cheque, these methods are linked to course masters in a payment group. The payment group is then displayed within registration forms. This instructional video shows you how to add a payment method and then to link it to an existing group.
The message to the customer following payment will depend on the payment method’s ‘Available Online’ setting that is used:
-
No payment method on the form - the text says “Form submitted successfully Thanks for filling in that form, your reference is: 6AJ3S4”
-
Payment method on the form (offline) - Form submitted successfully Thanks for filling in that form, your reference is: 6AJ3S4
-
Payment method on the form (online, pay now link) - shows instructions from the Payment Method from ‘Customer Instructions Before Payment’ plus Pay Now link.
-
Payment method on the form (online, full HTML) - shows instructions from the Payment Method from ‘Customer Instructions Before Payment’.
It is also possible to alter this payment message using CSS files
Using payment methods to define workflow with external forms
If you wish students to complete a form such as a quiz or a language literacy and numeracy test it is possible to set up payment methods to instruct the student to complete these as part of the workflow. For example it is possible to have the student:
-
Enrol in the First Aid training course
-
Make payment via PayPal
-
Have the student complete a First Aid quiz
-
Email the student to request they complete a Language Literacy and Numeracy (LLN) test
Assuming you are using Full HTML payment methods and the LLN is the same for all courses this is done by setting up a payment method per quiz then using the ‘Customer Message After Payment’ to display a link to the First Aid quiz external form. Then include the link to the LLN external quiz in the email triggered by the internal type ‘Paid’.
Configuration
Step 1: process step(s) add to process path(s)
To make the extranet form links available to the payment method fields it is necessary to set up a process step for each extranet form (quiz) and add these to the process path for the course (specifying the extranet forms at the step on the path). This arrangement can use just one process path - but with multiple steps listed. Depending on the number of courses you are setting up it is also possible to configure multiple process paths allocated on a per course basis.
Step 2: payment methods and groups
Payment methods should be set up using the guidance as follows (with other fields like surcharge as required):
-
Name Use a name that distinguishes the payment method by course type eg: HLTAID004 First Aid
-
Label Use a payment method name indicative for the customer eg: Credit card and Paypal
-
Available Online Online Full HTML
-
Status Active
-
Customer Instructions for Email / PDF (no fields will be replaced) This field will not be used, though if you wish to provide specific course guidance related to the option to complete the test this content could then be included in emails.
-
Customer Instructions Before Payment For public courses include the outline of costs for: course, extras (from catalog items), discounts, tax surcharges and total. Include the link to payment. For private courses include the external form link (see below for this).
-
Customer Message After Payment For public courses include the link to the external form, for private courses this will not be used, as the student is directed to the external form and does not make payment. Example HTML for this section:
  <span style="font-size: large;">
      Now, complete your <a href="[Documents:DocumentUrlExtranet2004]">CPR exam prior to attending the course</a>
  </span>
There should be a payment method per course type that requires a different external form (and one if no form is required). If you have more than one online payment method to offer students you will need to include the same configuration for the external form on each. For private courses that do not require payment see below.
Create a payment group per course type that requires a different eternal form.
Step 3: course masters to use payment group
Each course master that requires the configured external forms in the workflow should have the payment group added to it.
Step 4: process rules and emails to deliver link to the next external form
It is not possible to have two uninterrupted external forms in the registration workflow. However it is possible to email a link to the student requesting them to complete the next external form. It is also possible to email a link to the first external form also. Using the picker for variables to include the external form you need to link to in the email. Each email will need a process rule, these can be course category dependent so that you can have a different email per category. Be careful to name the rules and emails so they are easy to work out which belong to which eg using a common name like “HLTAID004 First Aid Quiz” would make sense.
Keep in mind
Workflow variations of this configuration could be to cater for private vs public courses or to vary the workflow based on preferences of which quiz should be completed first eg it may be sensible to verify the LLN of a customer before asking them to complete an exam.
Private vs Public courses
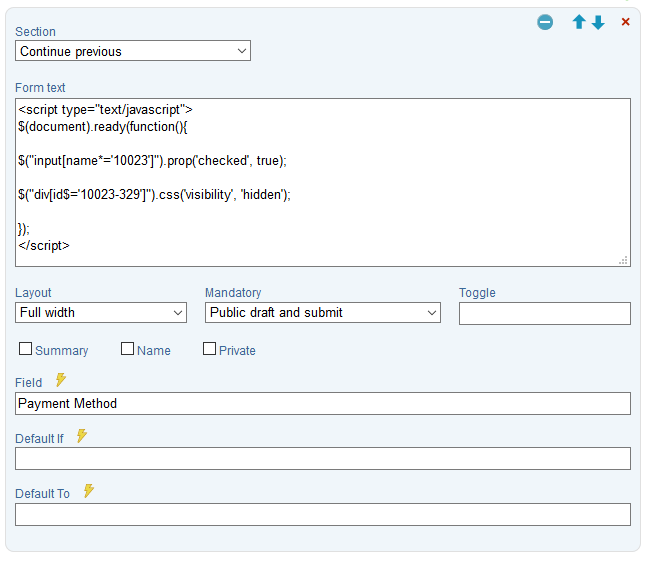
Public courses usually require payment at the point of registration, however private courses do not as these are often paid for via an invoice or in arrears. For this reason it is necessary to set up different payment methods for private and public courses, and quite likely different forms, process paths and therefore cours masters. . In the case of private courses the field ‘Customer Instructions Before Payment’ rather than ‘Customer Message After Payment’ is used to link to the external form. To make this seamless for the customer it is recommended the following javascript is entered in the form text of the payment method text for the private course (private courses usually have different forms to those of public courses). When using this code replace the “10023” with the FieldId for the payment method field and “368” with each PaymentMethodId (you need a new link of code for each payment method id). This code automatically checks the radio button to ensure the payment method is selected (even though we are not asking for payment).
<script type="text/javascript">
  $(document).ready(function(){
    $("input[name*='10023']").prop('checked', true);
    $("div[id$='10023-329']").css('visibility', 'hidden');
  });
</script>
Here is an example of where, on the form to add this code:
Display the forms in a different order
The preference may be to display the LLN first, then follow this up by the First Aid quiz as a link in the email. The change in configuration would be to have the same payment method, but to create unique emails (and corresponding process rules) on a per course basis. This might be useful when all your courses require an LLN but only some require a quiz. In each case customisation is required for each new course added.
Keeping the configuration up to date
It is also important to note that changing any details in the payment method eg your paypal account changes, will require all the payment methods to be updated. Similarly if you need to change the emails then all custom emails will need to be updated - usually it is more common that emails need to be updated than payment methods so the above example is the recommended configuration.
Configuring to use only one external form but with multiple quizzes
It is possible to configure a form to display fields based on the course category. If all other values of the form remain the same, ie the number of questions and the passmark is the same then it is possible to create subforms of questions (limit these to 75 fields) and have CourseSales.com display these subform fields (and therefore the 75 quiz questions) for only specific course categories. This can create a large and difficult to manage form but it can mean that you only require one course method and one email.
Testing
While you can do testing on a live course it is recommended that a complete test course is set up with a unique course category (eg “test only - please ignore”) course master and course description. While this may appear in the list of courses on a live site it is less likely to disrupt existing registrations and most likely to reflect an actual live environment. Make the course just $1 to enable full payment testing without hurting your wallet! Remember after creating a course date to test on you cancel it.
Test 1: Do the Process steps exist on the process path?
You can’t add the extranet form links if you don’t have the steps on the path and the forms in the extranet form field. While here check to see emails and rules exist as necessary. It is also suggested to confirm names are consistent, without consistency with the names it is hard to manage.
Test 2: Payment page content is as expected
First confirm that the correct payment page (after registration) appears when you choose to pay by each payment method. Do this by creating a payment group which includes all payment methods, this allows testing of each payment method configuration using the one document. When creating the payment group with all payment methods, these might have the same label - to not get confused by this note the order somewhere. It is also sensible to add indicators eg the payment method id, on the display pages to the customer. Add a registration - you should now be on the payment page. Using another browser log into the admin portal, edit the document just created and change the payment method, apply and then refresh/reload the payment page. You should see the payment page content changing to match that which you configured.
It can be useful to check that the correct values are sent to the payment provider, eg paypal. Do this by holding CTRL key and clicking the link - for most browsers this will open the payment provider’s payment page in another window. Confirm that the payment amounts are in the correct currency and correct amounts, and match those on the payment page.
Test 3: After payment page content is as expected
This will only be relevant for public courses (if you have configured private courses students never get to the after payment page). If you wish to check that a Paid response works as expected (but don’t need to test that the actual payment is working) then create a URL similar to:
https://<shortname>.coursesales.com/public/paid?h=1&DocumentExternalId=DJJFY8
this link is the same included in a Paypal “return url” field. As long as the DocumentExternalId is valid it will use the selected payment method on the form (for this reason changing the method on the document in the admin portal should display a different result). So once you are on this page you can cycle through the different payment methods, then refresh/reload this page to see how each changes.
Test 4: Check each course master works as expected
It is important to test a course date on each course master that is configured. This is especially important for complex configurations. It is possible for one course works as expected while another does not. There is no easy way to do this - just make a registration like a student, use the recommendation in Test 2, to avoid having to pay for each course! When you receive the email click on the link and confirm it works as expected.
Things that can help test is a table to check each configuration works as expected:
| As expected? | Course category 1: Public | Course category 1: Private |
|---|---|---|
| Payment method on registration form | ||
| Payment page content | ||
| Payment page link | ||
| Payment provider amount and currency | ||
| After payment page content | ||
| Fields dependent on course category displayed? | ||
| Email guidance and link | ||
| Response after link submission? |
Troubleshooting
Is the content ‘Customer Message After Payment’ not being displayed? If so this is likely because the Internal Payment type ‘Paid’ is not on the path or not defined. Check the logs… To fix see below.
Is there a payment option being displayed even though there is no payment method displayed on the form (but the payment method form is hidden)? It is likely that the payment step is not in the history of the document process path. This can be avoided in two ways:
- remove payment method from the form, don’t just make it private, remove it all together! This has the consequence of losing the payment method data and also invoices cannot be generated from that step, nor invoice tables in the additional details record.
- ensure that the paid step is on the history of the document, by applying that step.
If you unsure if the error is with the integration into your website (eg wordpress plugin) or the configuration within CourseSales.com use the public pages to ascertain if the configuration is working as expected.
ie https://<shortname>.coursesales.com/public/courses?h=1